Introduction
There is something truly comforting about homemade treats that bring both warmth and nostalgia to your kitchen. Sourdough discard pop tarts are one of those recipes that make you smile even before you take the first bite. They are golden, flaky, and filled with delicious jam or chocolate, and they turn your sourdough discard into something wonderful. This recipe transforms what many people throw away into a tasty and creative pastry that feels special. It is an easy and fun baking project that fills your home with the smell of butter and sweetness.
People love sourdough discard pop tarts because they combine the comforting flavor of a childhood favorite with the goodness of homemade sourdough dough. The result is a pastry that tastes rich yet slightly tangy, giving a unique twist to the traditional pop tart. Whether you enjoy them for breakfast, as an afternoon snack, or as a weekend baking treat, they are perfect for satisfying cravings without guilt. It is a simple way to make something delicious while reducing food waste and using your sourdough discard smartly.
You might choose to make sourdough discard pop tarts for many reasons. Perhaps you want to use up your sourdough discard in a creative way, or maybe you crave something warm and homemade to brighten your morning. These pastries are wonderful for family gatherings, school lunches, or even cozy weekend breakfasts. They can also be customized with different fillings such as fruit jam, nut butter, or even savory options like cheese and herbs. No matter the reason, these pop tarts always bring joy, comfort, and a sense of accomplishment that only homemade baking can give.
Ingredients You Will Need
Here are all the ingredients you need to make sourdough discard pop tarts. The list is simple, and most of these items are probably already in your kitchen.
For the Dough:
-
1 cup (240 grams) of sourdough discard
-
2 cups (250 grams) of all purpose flour
-
1 cup (230 grams) of unsalted butter, cold and cut into small cubes
-
2 tablespoons of granulated sugar
-
1 teaspoon of salt
-
1 large egg (for brushing and sealing the dough)
-
2 to 3 tablespoons of cold water, as needed
For the Filling:
-
½ cup of fruit jam, jelly, or preserve of your choice (strawberry, blueberry, raspberry, or any flavor you love)
-
Optional: 1 tablespoon of cornstarch mixed with 1 tablespoon of water (to thicken runny jams)
-
Optional: 2 tablespoons of chocolate spread or peanut butter for a fun variation
For the Glaze:
-
1 cup (120 grams) of powdered sugar
-
1 to 2 tablespoons of milk
-
½ teaspoon of vanilla extract
-
Sprinkles or crushed nuts for topping (optional)
Step by Step Method
Step 1: Prepare the Dough
Start by adding the flour, sugar, and salt into a large mixing bowl. Mix them together until they are well combined. Add the cold butter cubes into the bowl and use your fingertips or a pastry cutter to blend the butter into the flour. You should get a crumbly texture where small pieces of butter are still visible. These tiny butter bits will help make the pastry flaky when baked.
Next, add your sourdough discard and begin mixing gently with a fork. The discard adds a light tangy flavor and helps the dough come together beautifully. Add one or two tablespoons of cold water as needed to help bind the dough. Be careful not to overwork it because you want the pastry to stay soft and flaky. Once the dough comes together, shape it into a ball, wrap it with plastic wrap, and place it in the refrigerator for about 30 to 45 minutes to chill.
Step 2: Prepare the Filling
While your dough chills, prepare the filling of your choice. If you are using jam, make sure it is thick enough to stay inside the pastry while baking. If it is too runny, heat it in a small saucepan with a little cornstarch mixture until it thickens slightly, then let it cool completely. You can also use chocolate spread, nut butter, or even a mix of both for a rich dessert flavor.
Step 3: Roll Out the Dough
Take the chilled dough out of the refrigerator and cut it into two equal parts. Lightly dust your work surface with flour and roll out one portion of the dough until it is about one eighth of an inch thick. Try to make the dough even and rectangular so it is easy to cut later. Use a sharp knife or a pizza cutter to cut rectangles about three inches wide and four inches long. You can adjust the size depending on how large or small you want your pop tarts.
Step 4: Fill and Seal the Pop Tarts
Lay half of your rectangles on a parchment lined baking sheet. Place about one tablespoon of your chosen filling in the center of each rectangle, leaving some space around the edges. Brush the edges lightly with a beaten egg to help them seal properly. Now place another dough rectangle on top and gently press the edges together using your fingers. Then use a fork to crimp the edges and create that classic pop tart look. This also helps to seal the filling inside and prevents it from leaking out during baking.
Step 5: Chill Before Baking
Once all your pop tarts are assembled, place the baking sheet in the refrigerator for another 15 minutes. Chilling helps the dough stay firm and ensures that the butter remains cold, which makes the pastry flaky and crisp once baked. During this time, preheat your oven to 375 degrees Fahrenheit (190 degrees Celsius).
Step 6: Bake the Pop Tarts
Before placing them in the oven, brush the tops lightly with the remaining beaten egg. This step will give your pop tarts a lovely golden color. Bake for about 20 to 25 minutes, or until the tops are golden brown and the edges are crisp. Once baked, remove them from the oven and allow them to cool completely on a wire rack before adding the glaze.
Step 7: Prepare the Glaze
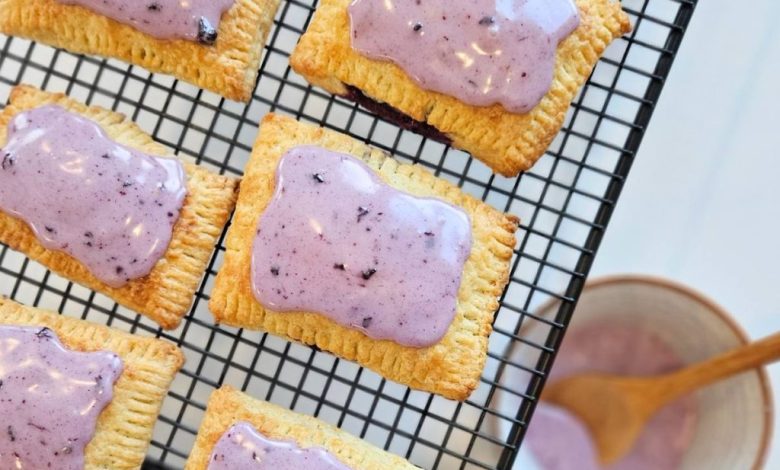
In a small bowl, mix the powdered sugar, milk, and vanilla extract until smooth. The glaze should be thick but pourable. You can adjust the consistency by adding a little more milk if needed. Spoon or drizzle the glaze over the cooled pop tarts and add sprinkles, crushed nuts, or a dusting of cinnamon sugar on top if you like. Let the glaze set for about 10 to 15 minutes before serving.
Step 8: Serve and Enjoy
Once the glaze is set, your sourdough discard pop tarts are ready to enjoy. Serve them warm for a soft and comforting texture, or store them in an airtight container and enjoy them at room temperature. They are perfect for breakfast, snacks, or even a dessert treat after dinner.
Why This Recipe Is Special
Sourdough discard pop tarts are more than just a treat. They are a clever and delicious way to make the most out of your sourdough starter. Instead of throwing away the discard, you turn it into a buttery pastry that tastes both nostalgic and fresh. The tanginess from the sourdough adds a new layer of flavor that pairs beautifully with the sweet filling.
This recipe is also easy to customize. You can fill your pop tarts with fruit jams for a bright flavor or use chocolate and nut butter for something indulgent. You can even experiment with savory fillings like cheese and herbs for a snack version. The possibilities are endless, and that makes the recipe fun and creative.
Health-wise, sourdough discard pop tarts have a few benefits compared to store-bought pastries. The natural fermentation in sourdough can help make the dough easier to digest, and the homemade version allows you to control sugar levels and avoid preservatives. You can use whole wheat flour, organic butter, or low sugar jam to make it even healthier. It is a recipe that brings both comfort and a sense of well-being, knowing you made something wholesome at home.
Extra Tips for Better Taste
-
Use cold butter every time you make the dough. It helps create layers and keeps the texture flaky.
-
Do not overmix the dough. Overmixing makes the pastry tough instead of soft and tender.
-
Try different fillings to keep things interesting. Apple cinnamon, raspberry chocolate, or even lemon curd make great options.
-
Add a touch of spice such as cinnamon, nutmeg, or cardamom to the dough for a warm, aromatic flavor.
-
For a shiny look, brush a little milk instead of egg before baking if you prefer an egg-free version.
-
Let them cool completely before adding glaze. If they are warm, the glaze will melt and slide off.
-
Store properly by keeping them in an airtight container for up to three days, or freeze them for longer. Reheat in a toaster oven for that freshly baked feel.
-
Make mini pop tarts for parties or kid-friendly snacks. They are cute, easy to eat, and just as delicious.
-
Add crushed nuts or seeds to the top for extra crunch and nutrition.
-
Try savory versions using cheese, pesto, or cooked vegetables for a fun twist.
Final Thoughts
Making sourdough discard pop tarts is one of those baking projects that truly feels rewarding. It takes something simple and turns it into a delightful, golden, and flavorful pastry that everyone loves. Whether you are new to baking or already an expert, this recipe brings both joy and creativity to your kitchen. The gentle tang from the sourdough pairs perfectly with the sweetness of the filling, giving you a taste that is comforting yet unique.
These homemade pop tarts are not only delicious but also a wonderful reminder that food waste can be turned into something beautiful and satisfying. They are perfect for any time of the day, and each bite is filled with buttery layers and tasty fillings. Once you try them, you might never go back to store-bought versions again.
So next time you have some sourdough discard sitting in your fridge, do not throw it away. Turn it into a batch of warm, flaky, and flavorful pop tarts that will fill your home with joy and your table with smiles.
Nutrition Details
Below is an approximate nutrition breakdown for one serving (one pop tart) and the full batch.
This may vary slightly depending on the type of jam or flour used.
| Nutrient | Per Pop Tart | Full Recipe (8 pop tarts) |
|---|---|---|
| Calories | 310 kcal | 2480 kcal |
| Carbohydrates | 38 g | 304 g |
| Protein | 5 g | 40 g |
| Fat | 16 g | 128 g |
| Saturated Fat | 9 g | 72 g |
| Sugar | 15 g | 120 g |
| Fiber | 2 g | 16 g |
| Sodium | 210 mg | 1680 mg |
| Cholesterol | 55 mg | 440 mg |
| Calcium | 25 mg | 200 mg |
| Iron | 1.8 mg | 14.4 mg |
These values are estimates and may change based on ingredient brands and quantities.
Disclaimer
This recipe is meant for general enjoyment and home baking purposes. Everyone’s body reacts differently to ingredients, especially when it comes to dairy, gluten, or sugar. If you have any food sensitivities or medical conditions, please consult your healthcare professional before making changes to your diet. Always enjoy homemade treats in moderation as part of a balanced lifestyle.