Introduction
Canning butter is one of those old-fashioned kitchen secrets that has found its way back into modern homes. People who love traditional food preservation methods are turning to canning butter because it allows them to enjoy the taste and richness of butter for months without worrying about it spoiling. The process is simple, rewarding, and a bit nostalgic because it connects us to the way our grandparents used to store food before refrigerators became common. The idea of seeing shining jars of golden butter lined up in your pantry is not only satisfying but also comforting. It gives you the feeling of security that your family will always have a fresh and creamy spread ready to enjoy.
Many people love canning butter because it tastes just as good as fresh butter when opened. It melts beautifully, spreads easily, and adds that classic creamy flavor to everything from morning toast to baked potatoes. Canned butter can also be used for baking cookies, making sauces, or frying eggs. What makes it even better is that it stays stable for months when stored correctly. You can open a jar during winter or camping trips and find it just as smooth and flavorful as the day you canned it. This long shelf life and reliable taste make it a favorite among home cooks and food preservers.
There are many reasons to make canned butter. Some people do it to save money by buying butter in bulk when it is cheaper and then preserving it for later. Others do it for emergencies or outdoor adventures when refrigeration might not be available. Canned butter can also be a thoughtful homemade gift for friends and family who appreciate wholesome, handmade food. Emotionally, there is something very comforting about canning your own butter. It makes you feel resourceful, prepared, and connected to a simpler way of living. Whether you want it for survival storage, a delicious pantry addition, or the pure joy of making something by hand, canning butter is a rewarding and practical kitchen skill.
Ingredients You Will Need
To make canned butter, you only need a few simple things that you probably already have in your kitchen. The process focuses on quality and cleanliness, so every item matters.
Ingredients:
-
Unsalted butter: 1 kilogram (or about 4 cups)
-
Salt (optional): 1 teaspoon
-
Boiling water: for sterilizing jars
Equipment:
-
Clean glass canning jars with lids
-
A large saucepan or double boiler
-
A ladle
-
A clean towel or paper towels
-
A wooden spoon or silicone spatula
-
A pressure canner or large pot for water bath canning
Step by Step Method
Step 1: Prepare your jars
Begin by washing your canning jars and lids in warm soapy water. Rinse them well and place them in a large pot of boiling water for at least ten minutes to sterilize them. This step ensures that no bacteria or impurities will spoil your butter. Keep the jars warm in the hot water until you are ready to fill them. Cold jars can crack if you pour in hot butter, so keeping them warm prevents breakage.
Step 2: Melt the butter
Place your butter in a large saucepan or double boiler. Heat it slowly over medium heat until it melts completely. Stir occasionally with a wooden spoon to keep it from burning. If you see white foam forming on top, that is just the milk solids separating. You can skim off some of it with a spoon if you want a clearer, smoother butter, but it is not necessary. The goal here is to melt it gently without letting it brown or burn.
Step 3: Pour the butter into jars
Once the butter is completely melted and clear, carefully ladle it into your warm jars. Leave about one inch of space at the top of each jar to allow for expansion as it cools. Wipe the rims with a clean towel to remove any butter residue. This helps create a perfect seal later. Place the lids on the jars but do not tighten them too much. They should be snug but still able to let air escape during the heating process.
Step 4: Process the jars
Now you will need to heat the filled jars to ensure they are properly sealed and safe for long-term storage. You can use a pressure canner or a large water bath canner. If using a pressure canner, follow the manufacturer’s directions carefully. Usually, it involves heating the jars for around 60 minutes at 10 pounds of pressure. If using a water bath, place the jars in a pot of boiling water making sure the water covers them by at least one inch. Boil for about 90 minutes. This heating process kills any bacteria and helps the lids seal tightly.
Step 5: Let the jars cool
After processing, use tongs to remove the jars carefully and place them on a clean towel or cooling rack. Do not move them around or open them while they cool. As they begin to cool, you will hear the satisfying popping sound of the lids sealing shut. This is a good sign that your butter has been canned correctly. Let the jars sit undisturbed for 12 to 24 hours. Once they are completely cool, check the seals by pressing the center of each lid. If it does not move up or down, the jar is sealed properly.
Step 6: Store the butter
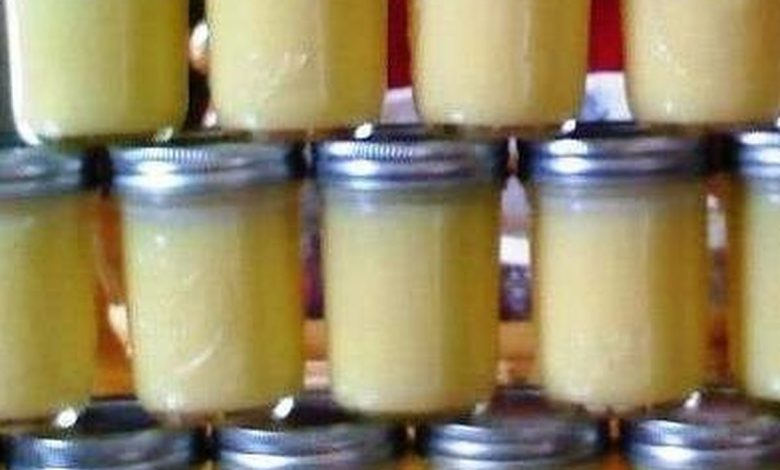
Label your jars with the date and store them in a cool, dark place like a pantry or cupboard. Avoid keeping them in direct sunlight or near heat sources. Canned butter can last for up to one year if stored correctly. When you are ready to use it, open a jar and enjoy the creamy golden butter on bread, pancakes, vegetables, or any recipe that calls for butter.
Why This Recipe Is Special
Canning butter is more than just a way to store dairy. It is a method that helps preserve a bit of comfort and warmth in a jar. The main reason this recipe is special is its practicality. Butter is a kitchen staple that most people use daily, and having it shelf-stable for months can be a real convenience. It means you can always have butter ready to use even if your refrigerator is full or you are traveling off-grid.
Another reason this recipe stands out is the taste. Unlike store-bought canned goods, homemade canned butter keeps its rich and creamy flavor. When you open a jar, the aroma and smooth texture are just like freshly churned butter. You can use it for baking, cooking, or spreading, and it blends beautifully with other ingredients. It is also satisfying to know exactly what goes into your butter. You are not using preservatives or artificial additives, just pure dairy goodness.
From a health perspective, butter in moderation provides healthy fats that support brain function and help your body absorb vitamins. Canning butter allows you to enjoy these natural benefits without worrying about spoilage. It also helps reduce food waste since you can preserve bulk butter before it expires. For families who prefer homemade food, this recipe adds a personal touch that feels both wholesome and rewarding.
Extra Tips for Better Taste
-
Use high-quality butter: The flavor of your canned butter depends entirely on the butter you start with. Choose pure, unsalted, high-quality butter for the best results. The better the butter, the better the final taste.
-
Add a pinch of salt for flavor: If you prefer salted butter, you can mix in a small amount of salt before pouring it into jars. This enhances flavor and gives it that familiar savory touch.
-
Avoid overheating: Melting butter too fast can burn the milk solids, giving your butter a bitter taste. Keep the heat moderate and stir often to maintain smoothness.
-
Try flavored variations: You can add herbs or spices for creative versions. For example, mix in a little garlic powder, cinnamon, or honey for unique flavored butters. Just make sure to use dry ingredients only since fresh herbs can cause spoilage.
-
Keep everything clean: Cleanliness is the key to successful canning. Make sure your jars, lids, and utensils are properly sterilized before you begin. This prevents bacteria from forming and ensures long shelf life.
-
Check your seals regularly: Before using a jar, always check that the lid is still tightly sealed. If it has loosened or popped open, do not use it. Proper sealing ensures safety and freshness.
-
Rotate your stock: Label each jar with the date and use the oldest ones first. This way, you always have the freshest batch ready to enjoy.
-
Use small jars for convenience: Smaller jars are great for daily use because once opened, the butter should be consumed within a few days. This helps prevent waste and keeps the rest safely sealed.
Final Thoughts
Canning butter is a wonderful skill that combines tradition with practicality. It allows you to enjoy the pure, rich taste of butter anytime you want without worrying about it spoiling. Whether you are stocking your pantry for emergencies, preparing for winter, or just love the idea of homemade food, canned butter is a fantastic choice. It saves money, reduces waste, and adds a warm touch to your kitchen routine.
Making canned butter is also emotionally rewarding. Watching the melted butter turn into golden jars of preserved goodness gives you a sense of accomplishment. It feels good to know that you have made something natural, wholesome, and useful for your family. The process is simple enough for beginners yet meaningful enough to make you proud of your work. Once you try it, you will likely keep it as a regular part of your home cooking routine.
So, gather your ingredients, clean your jars, and start your canning adventure. You will soon have beautiful jars of golden butter ready to brighten your meals all year long.
Nutrition Details
Below is the approximate nutrition information for one tablespoon of canned butter. These values can vary slightly depending on the type of butter used.
| Nutrient | Amount per Serving (1 tbsp) |
|---|---|
| Calories | 102 kcal |
| Total Fat | 11.5 g |
| Saturated Fat | 7.3 g |
| Cholesterol | 31 mg |
| Sodium | 1 mg (if unsalted) |
| Total Carbohydrates | 0 g |
| Protein | 0.1 g |
| Vitamin A | 90 mcg |
| Calcium | 3 mg |
| Iron | 0 mg |
Recipe Yield: About 1 kilogram of butter fills 4 to 5 small jars.
Serving Size: One tablespoon (14 grams).
Shelf Life: Up to 12 months when stored in a cool, dark place.
Disclaimer
This article is for educational purposes only and should not replace professional health advice. Every person’s body is different, and results may vary depending on diet, health conditions, and lifestyle. Always make sure that your canning process follows safe food preservation guidelines. If you are unsure about your canning method or equipment, consult reliable food safety resources before starting.
Keywords used naturally for SEO:
canning butter, how to can butter, homemade canned butter, preserve butter, butter storage, shelf stable butter, canning butter recipe, butter preservation method, how to make canned butter at home, butter for long term storage