Introduction
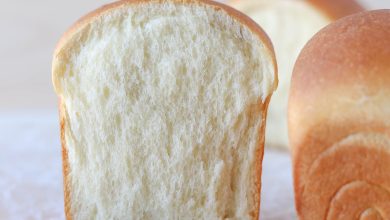
There are few things in the world as comforting as the smell of freshly baked bread. It fills your kitchen with warmth and joy and makes everyone feel at home. Sourdough one hour buns are a wonderful recipe for anyone who loves homemade bread but does not have all day to wait for a long rise. This recipe gives you soft, fluffy, and flavorful buns made from sourdough starter in only about one hour. They are perfect for dinner rolls, sandwich buns, or simply to enjoy warm with butter.
People love these buns because they have the perfect balance of light texture and rich sourdough flavor. Unlike many bread recipes that take several hours or even overnight to make, this one is quick yet still full of character. The sourdough starter gives the buns a gentle tang that makes them taste special and homemade. You do not need to be an expert baker to make them. Even beginners can follow this easy process and enjoy success from the very first try.
You can make these sourdough one hour buns for many occasions. They are great when you need a quick side for soup or salad, or when you want fresh bread for your family dinner. They can also be shaped smaller for sliders or bigger for burgers. The recipe is flexible, simple, and satisfying. It is also a healthier choice compared to store-bought bread because sourdough helps make the dough easier to digest. With this recipe, you can enjoy fresh, homemade buns any day without waiting for hours.
Ingredients You Will Need
-
1 cup active sourdough starter (fed and bubbly)
-
1 cup warm milk (around 38°C or just warm to touch)
-
2 tablespoons sugar
-
1 teaspoon salt
-
2 tablespoons melted butter or olive oil
-
3 cups all-purpose flour (plus more for kneading)
-
2 teaspoons instant yeast
-
1 egg (for egg wash, optional)
-
1 tablespoon water (for egg wash, optional)
Step by Step Method
Step 1: Prepare your sourdough starter
Make sure your sourdough starter is active and bubbly. Feed it a few hours before you plan to bake. When a small spoonful of the starter floats in water, it is ready to use.
Step 2: Mix the wet ingredients
In a large mixing bowl, combine the warm milk, sugar, salt, and melted butter. Stir until everything is dissolved and mixed well. Add the active sourdough starter and stir again until combined.
Step 3: Add the dry ingredients
Add 2 and a half cups of flour to the bowl along with the instant yeast. Mix the dough with a wooden spoon or your hands until it starts to come together. The dough will be slightly sticky at this stage. Add a little more flour, a few tablespoons at a time, until the dough forms a soft ball.
Step 4: Knead the dough
Lightly flour a clean surface and place the dough on it. Knead it for about 5 to 7 minutes until it becomes smooth and stretchy. You can also use a stand mixer with a dough hook if you prefer. The dough should feel soft and springy, not too stiff.
Step 5: First rise
Place the dough back into the mixing bowl and cover it with a towel. Let it rest in a warm spot for 20 minutes. This short rise gives the dough a little lift and allows the yeast and sourdough to start working together.
Step 6: Shape the buns
After the first rise, gently punch down the dough to release any air. Divide the dough into 8 equal parts for large buns or 10 to 12 parts for smaller ones. Shape each piece into a smooth ball by tucking the edges under. Place the buns on a baking tray lined with parchment paper, leaving a little space between each one.
Step 7: Second rise
Cover the tray lightly with a kitchen towel and let the buns rest for 15 to 20 minutes. They will puff up slightly during this time. While they rise, preheat your oven to 200°C (400°F).
Step 8: Prepare for baking
If you want shiny, golden buns, whisk the egg with a tablespoon of water to make an egg wash. Gently brush the top of each bun with the egg wash using a pastry brush. This step is optional but gives a lovely color and sheen.
Step 9: Bake the buns
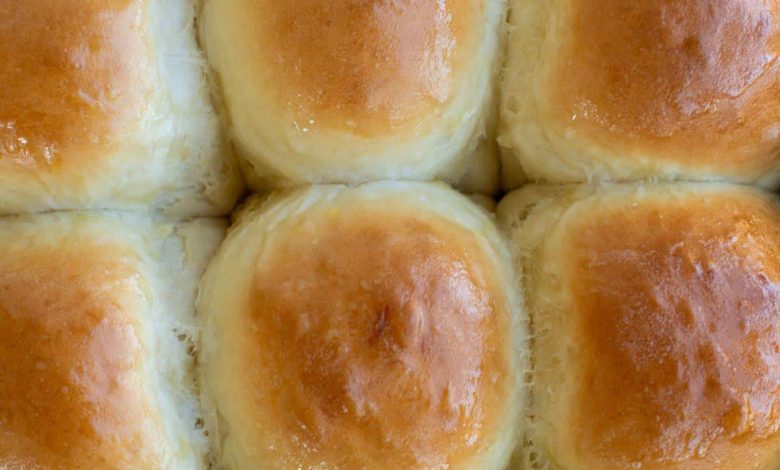
Place the tray in the preheated oven and bake for about 15 to 18 minutes or until the buns are golden brown on top. The bottoms should sound hollow when tapped.
Step 10: Cool and enjoy
Remove the buns from the oven and transfer them to a cooling rack. Let them cool for about 10 minutes before serving. They taste wonderful warm with butter, jam, or used as burger buns.
Why This Recipe Is Special
Sourdough one hour buns are special because they give you the goodness of sourdough in a short amount of time. Usually, sourdough recipes take many hours to rise, but this one combines a small amount of yeast with active starter to make the process fast. This means you can enjoy soft, flavorful bread in only one hour.
Another reason these buns are unique is the taste. The sourdough gives a mild tang that balances the sweetness of the dough. The texture is soft and airy inside, with a light golden crust outside. They stay fresh longer than many quick breads because sourdough naturally preserves moisture.
From a health point of view, sourdough fermentation helps break down some of the gluten and phytic acid in the flour, making the bread easier to digest. It also helps your body absorb minerals like iron and zinc better. So, while these buns are quick and easy, they are still nourishing and gentle on your stomach.
They also bring comfort and connection. Baking with sourdough feels like a mix of tradition and creativity. You are feeding something alive and turning it into food that brings people together. Every bun carries the warmth of your effort and care.
Extra Tips for Better Taste
-
Use a bubbly starter: The more active your sourdough starter is, the better your buns will rise. Feed it about 4 to 6 hours before baking.
-
Add flavor variations: Try adding a handful of shredded cheese, herbs like rosemary, or garlic powder to the dough for extra taste.
-
Brush with butter: After baking, brush the warm buns with melted butter for a rich flavor and soft crust.
-
Adjust flour carefully: Add flour slowly while mixing. The dough should be soft and slightly tacky but not sticky. Too much flour can make the buns dense.
-
Use milk for softness: Milk makes the dough tender and gives it a lovely golden color when baked. You can replace it with water if needed, but milk gives better flavor.
-
Warm environment helps: If your kitchen is cold, place the bowl near a warm stove or oven during rising. Dough rises faster in a cozy space.
-
Make ahead: You can prepare the dough, shape the buns, and store them covered in the fridge for a few hours. When ready to bake, let them rest at room temperature for about 20 minutes before baking.
-
Try different toppings: Sprinkle sesame seeds, poppy seeds, or rolled oats on top before baking for a bakery-style look.
Final Thoughts
Baking sourdough one hour buns is a wonderful way to enjoy homemade bread even on a busy day. It is quick, easy, and full of natural flavor. You do not need fancy equipment or long waiting times to make something that looks and tastes special. These buns are soft, flavorful, and can be served with anything from soups to sandwiches or simply enjoyed with butter and tea.
When you bake them, your home fills with a delicious smell that brings comfort and happiness. Sharing fresh bread with loved ones is one of the simplest joys in life. Once you try these buns, you will want to make them again and again. They will become your favorite go-to recipe whenever you crave fresh bread but do not have hours to spare.
Nutrition Details
| Nutrient | Per Recipe (8 Buns) | Per Serving (1 Bun) |
|---|---|---|
| Calories | 1440 kcal | 180 kcal |
| Carbohydrates | 240 g | 30 g |
| Protein | 48 g | 6 g |
| Fat | 40 g | 5 g |
| Saturated Fat | 16 g | 2 g |
| Cholesterol | 120 mg | 15 mg |
| Sodium | 960 mg | 120 mg |
| Fiber | 8 g | 1 g |
| Sugar | 16 g | 2 g |
| Calcium | 320 mg | 40 mg |
| Iron | 8 mg | 1 mg |
(Values are approximate and can change based on specific ingredients used.)
Disclaimer
This recipe is made for general enjoyment and simple home cooking. Everyone’s body is different, and nutrition or digestion results may vary. If you have any food allergies or special health conditions, please adjust the ingredients as needed or speak with a health professional before making changes to your diet.